
Conference organisation and event woes
Whether you work in a gallery, museum, archive, library or any other kind of institution related to collections care (or not), chances are you have, at some point or another, organised a conference, course, webinar, event, workshop, you name it!
And as you may know, many of us really want that certificate. In some cases, it's to justify spending the time to our institutions. Sometimes, we need to show it as proof of participation in order to get reimbursed. Other times, we need to have it to be able to prove that we are participating in Continued Professional Development (CPD).
Or maybe you're in the Education Team and you just need these certificates to hand out to the kids or other participants of your workshops.
So you've had to make certificates. Depending on your expertise, you may have used Power Point, Google Slides, Photoshop, InDesign,Figma, Canva, or any other kind of software that would allow you to make simple certificates.
However, chances are that regardless of which of these platforms you decided to use, you were still making your certificates one by one and changing people's names or participation types manually. And it probably took you forever.
So here I am again in my attempt to make your life easier! The following post will show you how to create participation certificates fast, and I mean FAST - I recently spent less than one hour for 60 certificates - and that's because I was working the learning curve. But just so you don't have to, here are some simple instructions.
Leverage Canva to bulk-create participation certificates fast
Step 1. Ditch whatever you are using and go to Canva. Unfortunately, this particular bulk create mode is not available to regular free accounts. Personally, I have found Canva to be so useful to me that it has become one of the few subcriptions I actually pay for.
For your purposes, however, you should note that Canva has a Canva for Nonprofits account. This means that if you are working in GLAM and are a registered nonprofit institution, all you need to do is talk to the Canva Team and they will give you a pro account for free.
Now, since none of us should be reinventing the wheel, I have found you the following YouTube video that already exists which shows you how to make certificates in Canva's bulk-create mode step-by-step.
All you need to have is all your participant names in a simple Excel table, and, if you wish, any other information that is likely to change by participant on the second column.
Canva will then take this information and create as many certificates as you need with the press of a single button.
Split the PDFs and you are done
And now you find yourself with a problem I had. I made 60+ certificates and I ended up with a 60+ page PDF file that I downloaded from Canva. Here are some general instructions on how to download files from Canva.
Option 1 is to individually download each Canva page as an independent PDF. This took FOREVER and you should not even attempt it unless you are bored and have time to kill.
Option 2 is to download all the certificates as a single PDF from Canva and then find another service to automatically split your 60-page PDF into 60 PDFs instead.
If you or your institution are paying for Adobe Acrobat, you can just do it in there. Here's a YouTube video to show you how.
If, like me, you don't pay for Adobe Acrobat, there are several free services where you can do this online. For example, you can try Adobe Acrobat's Split PDF or Split PDF by smallpdf.com. I will note that Adobe's online Split PDF version only allowed me to try once before it gave me an error screen and stoped me from using it again. This could be due to them or to my computer, but I didn't have time to troubleshoot this, so I went looking for other solutions.
Now, you may feel iffy about uploading your certificates with people's names to these online services, so you also have other options.
If you are on a Mac you can separate the PDF into individual PDF files by opening it in Preview and manually dragging each page out into a folder of your choosing. This is okay, I guess, but not fully automatic.
If you are on Windows this is what I am using myself. It's called PDF Merger & Splitter - and you can download it from the Microsoft Store as you can see in the YouTube video below.
Here's a quick screenshot. Once you select all of the PDF pages, choose Extract each selected page to a PDF. The program will then open the file saving window asking you where you want your files. Once you click Select Folder, this will automatically create however many pages you have in your PDF into individual PDF files which you can then send to your participants.
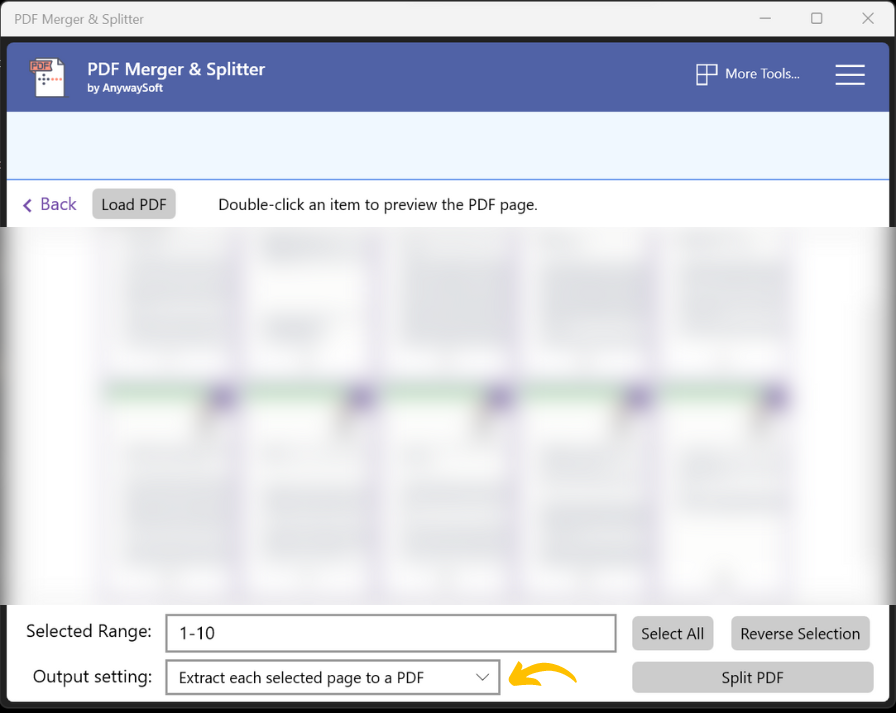
Choose to extract each selected page to a PDF to get each page to become its own file that you can now send participants.
This is not all
Once you figure out that you can use this bulk-create thing, you will never need to make individual letters for the same thing one by one again. The world is your oyster. I have used this same feature to make all kinds of letters and abstract templates. What will you use it for? With great power comes great responsibility, so use it wisely and let us all know about it so we can copy you too!
If you liked this post, you can follow me on Twitter, check out my newest Instagram experiments or connect with me on Linkedin. You can also sign up for the newsletter below to get my latest articles straight in your inbox.